


New to KubeDB? Please start here.
KubeDB - MariaDB Cluster
This tutorial will show you how to use KubeDB to provision a MariaDB Standard Replication in single-master mode.
Before You Begin
Before proceeding:
Read this to learn about MariaDB Standard Replication.
You need to have a Kubernetes cluster, and the kubectl command-line tool must be configured to communicate with your cluster. If you do not already have a cluster, you can create one by using kind.
Now, install KubeDB operator in your cluster following the steps here.
To keep things isolated, this tutorial uses a separate namespace called
demothroughout this tutorial. Run the following command to prepare your cluster for this tutorial:$ kubectl create ns demo namespace/demo created
Note: The yaml files used in this tutorial are stored in docs/examples/mysql folder in GitHub repository kubedb/docs.
Deploy MariaDB Cluster
The following is an example MariaDB object which creates a single-master MariaDB standard replication cluster with three members.
apiVersion: kubedb.com/v1
kind: MariaDB
metadata:
  name: sample-mariadb
  namespace: demo
spec:
  version: "10.6.16"
  replicas: 3
  topology:
    mode: MariaDBReplication
    maxscale:
      replicas: 3
      enableUI: true
      storageType: Durable
      storage:
        accessModes:
          - ReadWriteOnce
        resources:
          requests:
            storage: 50Mi
  storageType: Durable
  storage:
    accessModes:
    - ReadWriteOnce
    resources:
      requests:
        storage: 1Gi
  deletionPolicy: WipeOut
$ kubectl create -f https://github.com/kubedb/docs/raw/v2025.3.24/docs/guides/mariadb/clustering/galera-cluster/examples/demo-1.yaml
mariadb.kubedb.com/sample-mariadb created
Here,
spec.replicasDefines the number of MariaDB pods (instances) in the cluster.spec.storageSpecifies the StorageClass of PVC dynamically allocated to store data for this database. This storage spec will be passed to the PetSet created by KubeDB operator to run database pods. So, each members will have a pod of this storage configuration. You can specify any StorageClass available in your cluster with appropriate resource requests.spec.topologyConfigures the database topology and associated components.spec.topology.maxscaleSpecifies the Maxscale proxy server configuration.spec.topology.maxscale.replicasDefines the number of MaxScale replicas in the petset managed by the KubeDB Operator.spec.topology.maxscale.enableUIA boolean parameter (e.g. true or false) that controls whether the MaxScale GUI (accessible via the REST API) is enabled for the MaxScale instance.
KubeDB operator watches for MariaDB objects using Kubernetes API. When a MariaDB object is created, KubeDB operator will create a new PetSet and a Service with the matching MariaDB object name. KubeDB operator will also create a governing service for the PetSet with the name <mariadb-object-name>-pods.
$ kubectl get mariadb -n demo sample-mariadb -o yaml
apiVersion: kubedb.com/v1
kind: MariaDB
metadata:
  name: sample-mariadb
  namespace: demo
spec:
  allowedSchemas:
    namespaces:
      from: Same
  authSecret:
    activeFrom: "2025-04-08T06:42:36Z"
    name: sample-mariadb-auth
  deletionPolicy: WipeOut
  healthChecker:
    failureThreshold: 1
    periodSeconds: 10
    timeoutSeconds: 10
  podTemplate:
    spec:
      containers:
      - name: mariadb
        resources:
          limits:
            memory: 1Gi
          requests:
            cpu: 500m
            memory: 1Gi
        securityContext:
          allowPrivilegeEscalation: false
          capabilities:
            drop:
            - ALL
          runAsGroup: 999
          runAsNonRoot: true
          runAsUser: 999
          seccompProfile:
            type: RuntimeDefault
      - name: md-coordinator
        resources:
          limits:
            memory: 256Mi
          requests:
            cpu: 200m
            memory: 256Mi
        securityContext:
          allowPrivilegeEscalation: false
          capabilities:
            drop:
            - ALL
          runAsGroup: 999
          runAsNonRoot: true
          runAsUser: 999
          seccompProfile:
            type: RuntimeDefault
      initContainers:
      - name: mariadb-init
        resources:
          limits:
            memory: 512Mi
          requests:
            cpu: 200m
            memory: 256Mi
        securityContext:
          allowPrivilegeEscalation: false
          capabilities:
            drop:
            - ALL
          runAsGroup: 999
          runAsNonRoot: true
          runAsUser: 999
          seccompProfile:
            type: RuntimeDefault
      podPlacementPolicy:
        name: default
      securityContext:
        fsGroup: 999
      serviceAccountName: sample-mariadb
  replicas: 3
  storage:
    accessModes:
    - ReadWriteOnce
    resources:
      requests:
        storage: 1Gi
  storageType: Durable
  topology:
    maxscale:
      enableUI: true
      podTemplate:
        spec:
          containers:
          - name: maxscale
            securityContext:
              allowPrivilegeEscalation: false
              capabilities:
                drop:
                - ALL
              runAsNonRoot: true
              runAsUser: 997
              seccompProfile:
                type: RuntimeDefault
          initContainers:
          - name: maxscale-init
            resources:
              limits:
                memory: 512Mi
              requests:
                cpu: 200m
                memory: 256Mi
            securityContext:
              allowPrivilegeEscalation: false
              capabilities:
                drop:
                - ALL
              runAsNonRoot: true
              runAsUser: 997
              seccompProfile:
                type: RuntimeDefault
          podPlacementPolicy:
            name: default
          securityContext:
            fsGroup: 997
          serviceAccountName: sample-mariadb
      replicas: 3
      storage:
        accessModes:
        - ReadWriteOnce
        resources:
          requests:
            storage: 50Mi
      storageType: Durable
    mode: MariaDBReplication
  version: 10.6.16
status:
  conditions:
  ...
  observedGeneration: 2
  phase: Ready


$ kubectl get petset,svc,secret,pvc,pv,pod -n demo
NAME                                             AGE
petset.apps.k8s.appscode.com/sample-mariadb      53s
petset.apps.k8s.appscode.com/sample-mariadb-mx   56s


NAME                          TYPE        CLUSTER-IP      EXTERNAL-IP   PORT(S)    AGE
service/sample-mariadb           ClusterIP   10.43.110.13    <none>        3306/TCP            60s
service/sample-mariadb-mx        ClusterIP   10.43.149.170   <none>        3306/TCP,8989/TCP   60s
service/sample-mariadb-mx-pods   ClusterIP   None            <none>        3306/TCP            60s
service/sample-mariadb-pods      ClusterIP   None            <none>        3306/TCP            60s
service/sample-mariadb-standby   ClusterIP   10.43.84.224    <none>        3306/TCP            60s

NAME                                TYPE                                  DATA   AGE
secret/default-token-696cj          kubernetes.io/service-account-token   3      121m
secret/sample-mariadb-auth          kubernetes.io/basic-auth              2      116m
secret/sample-mariadb-token-dk4dx   kubernetes.io/service-account-token   3      116m

NAME                                             STATUS   VOLUME                                     CAPACITY   ACCESS MODES   STORAGECLASS   AGE
persistentvolumeclaim/data-sample-mariadb-0      Bound    pvc-ce1faccf-8e33-49c6-8520-7b8bb24bb01a   1Gi        RWO            local-path     <unset>                 3m6s
persistentvolumeclaim/data-sample-mariadb-1      Bound    pvc-2fd2d566-0a32-45d8-af0d-88a1f755ccbc   1Gi        RWO            local-path     <unset>                 3m6s
persistentvolumeclaim/data-sample-mariadb-2      Bound    pvc-77a2cc33-4f8b-4de7-a591-acd97ceb3dce   1Gi        RWO            local-path     <unset>                 3m6s
persistentvolumeclaim/data-sample-mariadb-mx-0   Bound    pvc-c6b54166-9c42-4211-9439-ab63fd1aae89   50Mi       RWO            local-path     <unset>                 3m9s
persistentvolumeclaim/data-sample-mariadb-mx-1   Bound    pvc-eaec319b-33d1-4fac-8234-7eadfbad0e61   50Mi       RWO            local-path     <unset>                 3m9s
persistentvolumeclaim/data-sample-mariadb-mx-2   Bound    pvc-733c4cde-3756-44ab-b652-17425e0e210f   50Mi       RWO            local-path     <unset>                 3m9s

NAME                                                        CAPACITY    ACCESS MODES   RECLAIM POLICY   STATUS   CLAIM                           STORAGECLASS   REASON   AGE
persistentvolume/pvc-1d0b5bcd-2699-4b87-b57b-3072ddc1027f   1Gi         RWO            Delete           Bound    demo/data-sample-mariadb-1      local-path              116m
persistentvolume/pvc-1e259abc-5937-421a-990c-b903a83d2d8a   1Gi         RWO            Delete           Bound    demo/data-sample-mariadb-0      local-path              116m
persistentvolume/pvc-5b85a06e-17f5-487a-9150-e928f5cf4590   1Gi         RWO            Delete           Bound    demo/data-sample-mariadb-2      local-path              116m
persistentvolume/pvc-c6b54166-9c42-4211-9439-ab63fd1aae89   50Mi        RWO            Delete           Bound    demo/data-sample-mariadb-mx-0   local-path              116m
persistentvolume/pvc-c6b54166-9c42-4211-9439-ab63fd1aae89   50Mi        RWO            Delete           Bound    demo/data-sample-mariadb-mx-1   local-path              116m
persistentvolume/pvc-eaec319b-33d1-4fac-8234-7eadfbad0e61   50Mi        RWO            Delete           Bound    demo/data-sample-mariadb-mx-2   local-path              116m

NAME                   READY   STATUS    RESTARTS   AGE
pod/sample-mariadb-0      2/2     Running   0          3m6s
pod/sample-mariadb-1      2/2     Running   0          3m6s
pod/sample-mariadb-2      2/2     Running   0          3m6s
pod/sample-mariadb-mx-0   1/1     Running   0          3m9s
pod/sample-mariadb-mx-1   1/1     Running   0          3m9s
pod/sample-mariadb-mx-2   1/1     Running   0          3m9s
Check the Cluster Status
Now, we are ready to check newly created cluster status. Connect to maxscale pod and run the following commands from any of the maxscale pod and you will get the same result.
$ kubectl exec -it -n demo svc/sample-mariadb-mx -- bash
bash-4.4$ maxctrl list servers
┌─────────┬─────────────────────────────────────────────────────────────┬──────┬─────────────┬─────────────────┬─────────┬────────────────────┐
│ Server  │ Address                                                     │ Port │ Connections │ State           │ GTID    │ Monitor            │
├─────────┼─────────────────────────────────────────────────────────────┼──────┼─────────────┼─────────────────┼─────────┼────────────────────┤
│ server1 │ sample-mariadb-0.sample-mariadb-pods.demo.svc.cluster.local │ 3306 │ 0           │ Master, Running │ 0-1-125 │ ReplicationMonitor │
├─────────┼─────────────────────────────────────────────────────────────┼──────┼─────────────┼─────────────────┼─────────┼────────────────────┤
│ server2 │ sample-mariadb-1.sample-mariadb-pods.demo.svc.cluster.local │ 3306 │ 0           │ Slave, Running  │ 0-1-125 │ ReplicationMonitor │
├─────────┼─────────────────────────────────────────────────────────────┼──────┼─────────────┼─────────────────┼─────────┼────────────────────┤
│ server3 │ sample-mariadb-2.sample-mariadb-pods.demo.svc.cluster.local │ 3306 │ 0           │ Slave, Running  │ 0-1-125 │ ReplicationMonitor │
└─────────┴─────────────────────────────────────────────────────────────┴──────┴─────────────┴─────────────────┴─────────┴────────────────────┘
Connecting to MariaDB Database
Once the database is in running state we can conncet to each of three nodes. We will use login credentials MYSQL_ROOT_USERNAME and MYSQL_ROOT_PASSWORD saved as container’s environment variable.
Create a Test User
Writing to a slave replica may result in a binary log (binlog) conflict issue. Initially the slave replica are in read only mode. But user with super privileges can still write the database of read only mode. The root user possesses superuser privileges, enabling them to modify a database even in read-only mode.
We recommend using a non-root user for production environments. The root user has extensive privileges, which can pose security risks. Therefore, it is advisable to create a dedicated user with appropriate permissions for production use.
$ kubectl exec -it -n demo svc/sample-mariadb -- bash
mysql@sample-mariadb-0:/ mariadb -u${MYSQL_ROOT_USERNAME} -p${MYSQL_ROOT_PASSWORD}
Welcome to the MariaDB monitor.  Commands end with ; or \g.
Your MariaDB connection id is 11
Server version: 10.5.23-MariaDB-1:10.5.23+maria~focal mariadb.org binary distribution

Copyright (c) 2000, 2018, Oracle, MariaDB Corporation Ab and others.

Type 'help;' or '\h' for help. Type '\c' to clear the current input statement.

# create user
MariaDB [(none)]> CREATE USER 'testuser'@'%' IDENTIFIED BY 'testpassword';
Query OK, 0 rows affected (0.001 sec)

# Grant all privileges to the user on all databases
MariaDB [(none)]> GRANT SELECT, INSERT, UPDATE, DELETE, CREATE, DROP, INDEX, ALTER, SHOW DATABASES ON *.* TO 'testuser'@'%' WITH GRANT OPTION;
Query OK, 0 rows affected (0.002 sec)

MariaDB [(none)]> FLUSH PRIVILEGES;
Query OK, 0 rows affected (0.000 sec)

MariaDB [(none)]> quit;
Bye
mysql@sample-mariadb-0:/ exit
exit
Check Connectivity using Test User
# Master Node
$ kubectl exec -it -n demo svc/sample-mariadb -- bash
mysql@sample-mariadb-0:/ mariadb -utestuser -ptestpassword
Welcome to the MariaDB monitor.  Commands end with ; or \g.
Your MariaDB connection id is 26
Server version: 10.5.23-MariaDB-1:10.5.23+maria~focal mariadb.org binary distribution

Copyright (c) 2000, 2018, Oracle, MariaDB Corporation Ab and others.

Type 'help;' or '\h' for help. Type '\c' to clear the current input statement.

MariaDB [(none)]> SELECT 1;
+---+
| 1 |
+---+
| 1 |
+---+
1 row in set (0.000 sec)

MariaDB [(none)]> quit;
Bye

# Slave Node
$ kubectl exec -it -n demo svc/sample-mariadb-standby -- bash
mysql@sample-mariadb-1:/ mariadb -utestuser -ptestpassword
Welcome to the MariaDB monitor.  Commands end with ; or \g.
Your MariaDB connection id is 94
Server version: 10.5.23-MariaDB-1:10.5.23+maria~focal mariadb.org binary distribution

Copyright (c) 2000, 2018, Oracle, MariaDB Corporation Ab and others.

Type 'help;' or '\h' for help. Type '\c' to clear the current input statement.

MariaDB [(none)]> SELECT 1;
+---+
| 1 |
+---+
| 1 |
+---+
1 row in set (0.000 sec)

MariaDB [(none)]> quit;
Bye

MariaDB [(none)]> quit;
Bye
Insert Data and Check Availability
In a MariaDB Replication Cluster, Only master member can write, and slave member can read. In this section, we will insert data from master node, and we will see whether we can get the data from every other slave members.
sample-mariadb-0 is the master node in our case.
Read the comment written for the following commands. They contain the instructions and explanations of the commands.
# master node
$ kubectl exec -it -n demo sample-mariadb-0 -- bash
mysql@sample-mariadb-0:/ mariadb -utestuser -ptestpassword
Welcome to the MariaDB monitor.  Commands end with ; or \g.
Your MariaDB connection id is 202
Server version: 10.5.23-MariaDB-1:10.5.23+maria~focal mariadb.org binary distribution

Copyright (c) 2000, 2018, Oracle, MariaDB Corporation Ab and others.

Type 'help;' or '\h' for help. Type '\c' to clear the current input statement.

MariaDB [(none)]> CREATE DATABASE playground;
Query OK, 1 row affected (0.013 sec)

# Create table in Node 1
MariaDB [(none)]> CREATE TABLE playground.equipment ( id INT NOT NULL AUTO_INCREMENT, type VARCHAR(50), quant INT, color VARCHAR(25), PRIMARY KEY(id));
Query OK, 0 rows affected (0.053 sec)

# Insert sample data into Node 1
MariaDB [(none)]> INSERT INTO playground.equipment (type, quant, color) VALUES ('slide', 2, 'blue');
Query OK, 1 row affected (0.003 sec)

# Read data from Node 1
MariaDB [(none)]> SELECT * FROM playground.equipment;
+----+-------+-------+-------+
| id | type  | quant | color |
+----+-------+-------+-------+
|  1 | slide |     2 | blue  |
+----+-------+-------+-------+
1 row in set (0.001 sec)

MariaDB [(none)]> quit;
Bye
mysql@sample-mariadb-0:/ exit
exit

# check slave node data

$ kubectl exec -it -n demo sample-mariadb-1 -- bash
mysql@sample-mariadb-1:/ mariadb -utestuser -ptestpassword
Welcome to the MariaDB monitor.  Commands end with ; or \g.
Your MariaDB connection id is 209
Server version: 10.5.23-MariaDB-1:10.5.23+maria~focal mariadb.org binary distribution

Copyright (c) 2000, 2018, Oracle, MariaDB Corporation Ab and others.

Type 'help;' or '\h' for help. Type '\c' to clear the current input statement.

# Read data from Node 2
MariaDB [(none)]> SELECT * FROM playground.equipment;
+----+-------+-------+-------+
| id | type  | quant | color |
+----+-------+-------+-------+
|  1 | slide |     2 | blue  |
+----+-------+-------+-------+
1 row in set (0.001 sec)
MariaDB [(none)]> quit;
Bye
mysql@sample-mariadb-1:/ exit
exit
~ $ kubectl exec -it -n demo sample-mariadb-2 -- bash
mysql@sample-mariadb-2:/  mariadb -utestuser -ptestpassword
Welcome to the MariaDB monitor.  Commands end with ; or \g.
Your MariaDB connection id is 209
Server version: 10.5.23-MariaDB-1:10.5.23+maria~focal mariadb.org binary distribution

Copyright (c) 2000, 2018, Oracle, MariaDB Corporation Ab and others.

Type 'help;' or '\h' for help. Type '\c' to clear the current input statement.

# Read data from Node 3
MariaDB [(none)]> SELECT * FROM playground.equipment;
+----+-------+-------+-------+
| id | type  | quant | color |
+----+-------+-------+-------+
|  1 | slide |     2 | blue  |
+----+-------+-------+-------+
3 rows in set (0.000 sec)

MariaDB [(none)]> quit
Bye
mysql@sample-mariadb-2:/# exit
exit
Automatic Failover
To test automatic failover, we will force the master pods to restart and check if it can switch the master and rejoin the cluster.
Read the comment written for the following commands. They contain the instructions and explanations of the commands.
# Forcefully delete master node
~ $ kubectl delete pod -n demo sample-mariadb-0
pod "sample-mariadb-0" deleted

Now exec into maxscale server and run the following command to check the server status and ensure the failover is working.

$ kubectl exec -it -n demo svc/sample-mariadb-mx -- bash
Defaulted container "maxscale" out of: maxscale, maxscale-init (init)
bash-4.4$ maxctrl list servers
┌─────────┬─────────────────────────────────────────────────────────────┬──────┬─────────────┬─────────────────┬───────────┬────────────────────┐
│ Server  │ Address                                                     │ Port │ Connections │ State           │ GTID      │ Monitor            │
├─────────┼─────────────────────────────────────────────────────────────┼──────┼─────────────┼─────────────────┼───────────┼────────────────────┤
│ server1 │ sample-mariadb-0.sample-mariadb-pods.demo.svc.cluster.local │ 3306 │ 0           │ Down            │ 0-1-14545 │ ReplicationMonitor │
├─────────┼─────────────────────────────────────────────────────────────┼──────┼─────────────┼─────────────────┼───────────┼────────────────────┤
│ server2 │ sample-mariadb-1.sample-mariadb-pods.demo.svc.cluster.local │ 3306 │ 0           │ Master, Running │ 0-1-14545 │ ReplicationMonitor │
├─────────┼─────────────────────────────────────────────────────────────┼──────┼─────────────┼─────────────────┼───────────┼────────────────────┤
│ server3 │ sample-mariadb-2.sample-mariadb-pods.demo.svc.cluster.local │ 3306 │ 0           │ Slave, Running  │ 0-1-14545 │ ReplicationMonitor │
└─────────┴─────────────────────────────────────────────────────────────┴──────┴─────────────┴─────────────────┴───────────┴────────────────────┘

# sample-mariadb-1 is new master.
# Wait some time to up sample-mariadb-0 and check the server list again

bash-4.4$ maxctrl list servers
┌─────────┬─────────────────────────────────────────────────────────────┬──────┬─────────────┬─────────────────┬───────────┬────────────────────┐
│ Server  │ Address                                                     │ Port │ Connections │ State           │ GTID      │ Monitor            │
├─────────┼─────────────────────────────────────────────────────────────┼──────┼─────────────┼─────────────────┼───────────┼────────────────────┤
│ server1 │ sample-mariadb-0.sample-mariadb-pods.demo.svc.cluster.local │ 3306 │ 0           │ Slave, Running  │ 0-2-14551 │ ReplicationMonitor │
├─────────┼─────────────────────────────────────────────────────────────┼──────┼─────────────┼─────────────────┼───────────┼────────────────────┤
│ server2 │ sample-mariadb-1.sample-mariadb-pods.demo.svc.cluster.local │ 3306 │ 0           │ Master, Running │ 0-2-14551 │ ReplicationMonitor │
├─────────┼─────────────────────────────────────────────────────────────┼──────┼─────────────┼─────────────────┼───────────┼────────────────────┤
│ server3 │ sample-mariadb-2.sample-mariadb-pods.demo.svc.cluster.local │ 3306 │ 0           │ Slave, Running  │ 0-2-14551 │ ReplicationMonitor │
└─────────┴─────────────────────────────────────────────────────────────┴──────┴─────────────┴─────────────────┴───────────┴────────────────────┘

All replicas up and srunning now.

# Now check `sample-mariadb-0` data
$ kubectl exec -it -n demo sample-mariadb-0 -- bash
mysql@sample-mariadb-0:/ mariadb -utestuser -ptestpassword
Welcome to the MariaDB monitor.  Commands end with ; or \g.
Your MariaDB connection id is 10
Server version: 10.5.23-MariaDB-1:10.5.23+maria~focal mariadb.org binary distribution

Copyright (c) 2000, 2018, Oracle, MariaDB Corporation Ab and others.

Type 'help;' or '\h' for help. Type '\c' to clear the current input statement.

# Check data after rejoining
MariaDB [(none)]> SELECT * FROM playground.equipment;
+----+-------+-------+-------+
| id | type  | quant | color |
+----+-------+-------+-------+
|  1 | slide |     2 | blue  |
+----+-------+-------+-------+
3 rows in set (0.002 sec)

MariaDB [(none)]> quit
Bye
Checking Proxy and Read-Write Split using Maxscale
To test the traffic routing through the ProxySQL server let’s first create a pod with ubuntu base image in it. We will use the following yaml.
apiVersion: apps/v1
kind: Deployment
metadata:
  labels:
    app: ubuntu
  name: ubuntu
  namespace: demo
spec:
  replicas: 1
  selector:
    matchLabels:
      app: ubuntu
  strategy: {}
  template:
    metadata:
      labels:
        app: ubuntu
    spec:
      containers:
        - image: ubuntu
          imagePullPolicy: IfNotPresent
          name: ubuntu
          command: ["/bin/sleep", "3650d"]
          resources: {}
Let’s apply the yaml.
$ kubectl apply -f https://github.com/kubedb/docs/raw/v2025.3.24/docs/guides/mariadb/clustering/mariadb-replication/examples/ubuntu.yaml
deployment.apps/ubuntu created
Let’s exec into the pod and install mariadb-client.
$ kubectl exec -it -n demo pod/ubuntu-bb47d8d6c-4vhjv -- bash                12:00
mysql@ubuntu-bb47d8d6c-4vhjv:/# apt update
... ... ..
mysql@ubuntu-bb47d8d6c-4vhjv:/# apt install mariadb-client -y
Reading package lists... Done
... .. ...
mysql@ubuntu-bb47d8d6c-4vhjv:/#
Now let’s try to connect with the Maxscale Proxy server through the sample-mariadb-mx service as the testuser user.
mysql@ubuntu-bb47d8d6c-4vhjv:/# mariadb -utestuser -ptestpassword -hsample-mariadb-mx.demo -P3306
Welcome to the MariaDB monitor.  Commands end with ; or \g.
Your MariaDB connection id is 1
Server version: 10.6.16-MariaDB-1:10.6.16+maria~ubu2004-log mariadb.org binary distribution

Copyright (c) 2000, 2018, Oracle, MariaDB Corporation Ab and others.

Type 'help;' or '\h' for help. Type '\c' to clear the current input statement.

MariaDB [(none)]>
We have successfully connected as the testuser user. Let’s execute some read and write queries using this connection.
MariaDB [(none)]> show databases;
+--------------------+
| Database           |
+--------------------+
| information_schema |
| kubedb_system      |
| mysql              |
| performance_schema |
| playground         |
| sys                |
+--------------------+
6 rows in set (0.001 sec)

MariaDB [(none)]> use playground;
Database changed

MariaDB [playground]> show tables;
+----------------------+
| Tables_in_playground |
+----------------------+
| equipment            |
+----------------------+
1 row in set (0.001 sec)

mysql> INSERT INTO equipment (type, quant, color) VALUES ('pot', 2, 'black');
Query OK, 1 row affected (0.01 sec)


MariaDB [playground]> select * from equipment;
+----+-------+-------+-------+
| id | type  | quant | color |
+----+-------+-------+-------+
|  1 | slide |     2 | blue  |
|  2 | pot   |     2 | black |
+----+-------+-------+-------+
2 rows in set (0.001 sec)


# Currently our server state is -
➤ kubectl exec -it -n demo pod/sample-mariadb-mx-0 -- bash
Defaulted container "maxscale" out of: maxscale, maxscale-init (init)
bash-4.4$ maxctrl list servers
┌─────────┬─────────────────────────────────────────────────────────────┬──────┬─────────────┬─────────────────┬───────────┬────────────────────┐
│ Server  │ Address                                                     │ Port │ Connections │ State           │ GTID      │ Monitor            │
├─────────┼─────────────────────────────────────────────────────────────┼──────┼─────────────┼─────────────────┼───────────┼────────────────────┤
│ server1 │ sample-mariadb-0.sample-mariadb-pods.demo.svc.cluster.local │ 3306 │ 1           │ Slave, Running  │ 0-2-52054 │ ReplicationMonitor │
├─────────┼─────────────────────────────────────────────────────────────┼──────┼─────────────┼─────────────────┼───────────┼────────────────────┤
│ server2 │ sample-mariadb-1.sample-mariadb-pods.demo.svc.cluster.local │ 3306 │ 1           │ Master, Running │ 0-2-52054 │ ReplicationMonitor │
├─────────┼─────────────────────────────────────────────────────────────┼──────┼─────────────┼─────────────────┼───────────┼────────────────────┤
│ server3 │ sample-mariadb-2.sample-mariadb-pods.demo.svc.cluster.local │ 3306 │ 1           │ Slave, Running  │ 0-2-52054 │ ReplicationMonitor │
└─────────┴─────────────────────────────────────────────────────────────┴──────┴─────────────┴─────────────────┴───────────┴────────────────────┘

# Now lets check read-write split

MariaDB [playground]> SELECT NOW(),@@hostname;
+---------------------+------------------+
| NOW()               | @@hostname       |
+---------------------+------------------+
| 2025-04-24 13:11:06 | sample-mariadb-2 |
+---------------------+------------------+
1 row in set (0.000 sec)

MariaDB [playground]> SELECT NOW(),@@hostname;
+---------------------+------------------+
| NOW()               | @@hostname       |
+---------------------+------------------+
| 2025-04-24 13:11:31 | sample-mariadb-2 |
+---------------------+------------------+
1 row in set (0.000 sec)

MariaDB [playground]> SELECT NOW(),@@hostname;
+---------------------+------------------+
| NOW()               | @@hostname       |
+---------------------+------------------+
| 2025-04-24 13:12:00 | sample-mariadb-0 |
+---------------------+------------------+
1 row in set (0.000 sec)

# Read queries are executed on the slave replica
# FYI: Both read and write operations can be executed on the master node.

# Now, let's check the write split.

MariaDB [playground]> CREATE DATABASE IF NOT EXISTS test_db;
Query OK, 1 row affected (0.001 sec)

MariaDB [playground]> CREATE TABLE test_db.t1 (id INT, hostname VARCHAR(100));
Query OK, 0 rows affected (0.009 sec)

MariaDB [playground]> INSERT INTO test_db.t1 (id, hostname) VALUES (1, @@hostname);
Query OK, 1 row affected (0.002 sec)

MariaDB [playground]> INSERT INTO test_db.t1 (id, hostname) VALUES (2, @@hostname);
Query OK, 1 row affected (0.002 sec)

MariaDB [playground]> INSERT INTO test_db.t1 (id, hostname) VALUES (3, @@hostname);
Query OK, 1 row affected (0.002 sec)

MariaDB [playground]> INSERT INTO test_db.t1 (id, hostname) VALUES (4, @@hostname);
Query OK, 1 row affected (0.002 sec)

MariaDB [playground]> SELECT * FROM test_db.t1;
+------+------------------+
| id   | hostname         |
+------+------------------+
|    1 | sample-mariadb-1 |
|    2 | sample-mariadb-1 |
|    3 | sample-mariadb-1 |
|    4 | sample-mariadb-1 |
+------+------------------+
4 rows in set (0.001 sec)

# Write queries are executed only on the master node.
We can see the queries are successfully executed through the Maxscale Proxy server and read write split is working as expected.
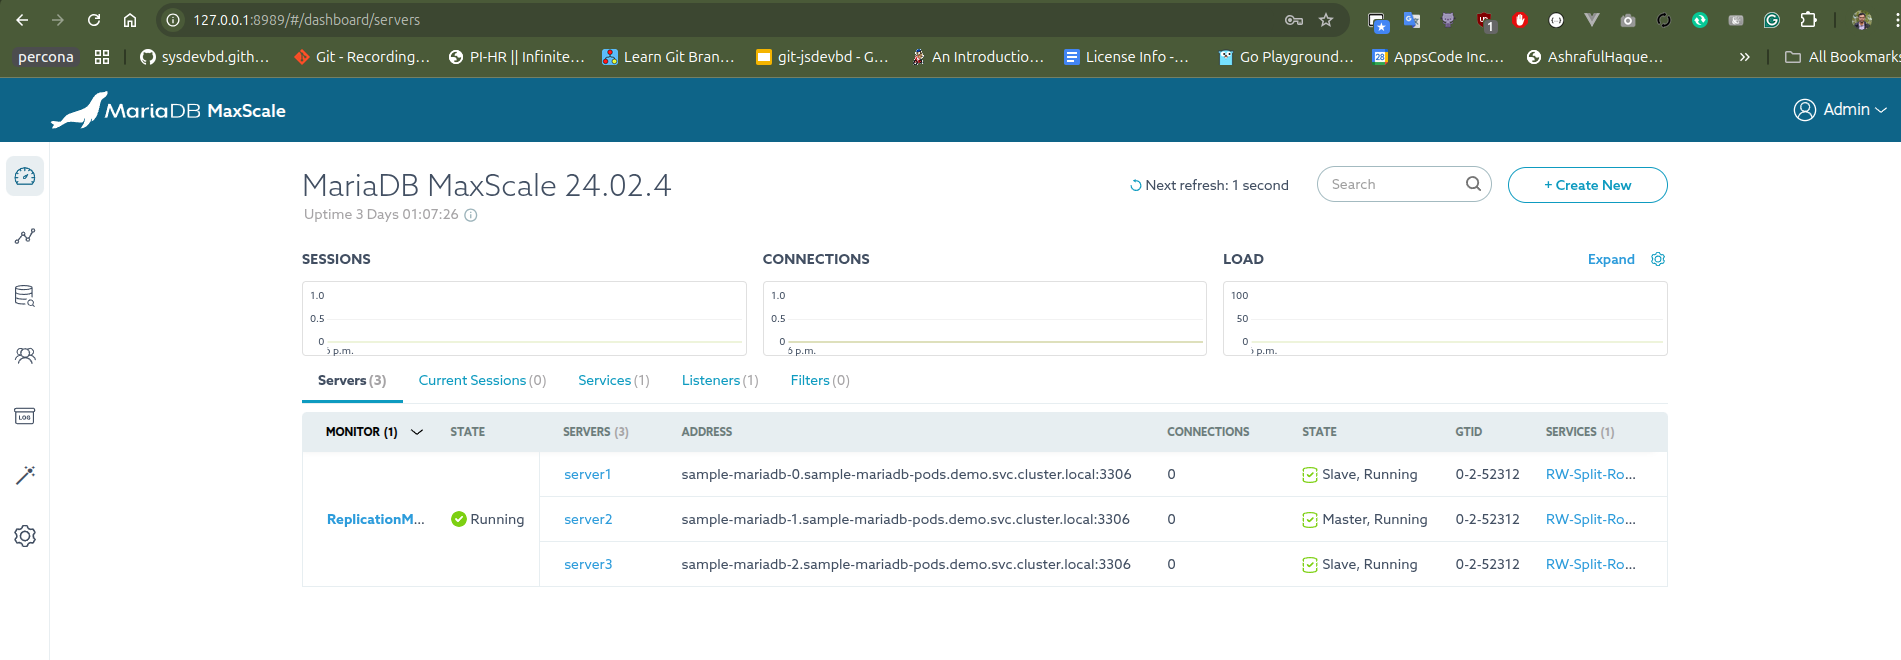
Access and Explore the MaxScale UI
To enable the MaxScale UI, set spec.topology.maxscale.enableUI: true in the configuration. The MaxScale UI runs on port 8989. To access it, use the following kubectl command to forward the port:
➤ kubectl port-forward -n demo service/sample-mariadb-mx 8989:8989
Forwarding from 127.0.0.1:8989 -> 8989
Forwarding from [::1]:8989 -> 8989
The MaxScale UI is accessible at http://127.0.0.1:8989.
Use the default credentials to log in:
- Username: admin
- Password: mariadb
After logging in, you will be greeted by an intuitive dashboard showcasing servers list and current node state.
Cleaning up
Let’s clean up what we created in this tutorial.
$ kubectl delete mariadb.kubedb.com -n demo sample-mariadb
mariadb.kubedb.com "sample-mariadb" deleted
$ kubectl delete -n demo deployment.apps/ubuntu
deployment.apps "ubuntu" deleted
$ kubectl delete ns demo
namespace "demo" deleted